Why buy from I Like Log Cabins?
We like to sell Great Garden Buildings at Great Prices with Great Service. As the leading online retailer of Log Cabins in the UK – we support UK Manufacturing – selling a large range of Traditional Log Cabins ideal for your garden all with Free UK Mainland Delivery*. So if you are looking for an extra room for when friends and family come to stay or a games room to play pool in or just somewhere to escape to – we have the perfect log cabin for you. We offer an installation service on all our log cabins and have an expert team on hand who can guide you through the buying and build process of your log cabin. Can’t find what you are looking for? Don’t worry we offer a bespoke service – just give us a call on 020 3795 0222 or email us at help@iliketosell.com with your specifications and we will get you our best price.
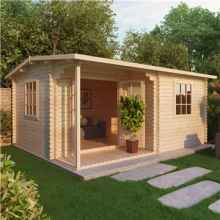
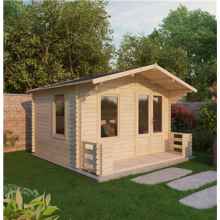
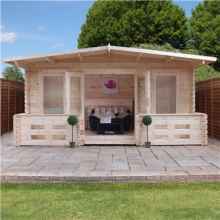
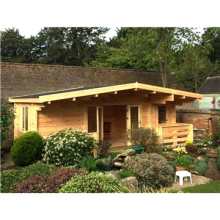
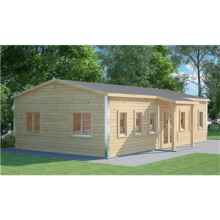
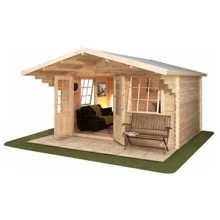
Traditional Log Cabins are perfect for any use. Whether it be for a spare room for visitors or somewhere to entertain guests on a summer evening. The possibilities are endless.
Do you work from home? Need some quiet time whilst working and need to get out of the house? Instead of taking up room in your home, maybe a Home Office log cabin is what you are looking for? Decorated in tranquil colours with your own choice of furniture, what better environment to work. Don’t forget to add a selection of plants to your working area to create a calming atmosphere.
Thinking of adding a games room to the house? Somewhere to get you out of the house for the evening without the expense of going out maybe? How about a Modern Log Cabin to transform into your own bar, you could add a pool table, a dart board, even maybe a TV. This will definitely give your friends something to talk about.
So you would like a log cabin but the height is maybe putting you off (or putting your neighbours off!) Pent Log Cabins come with a flat roof cutting the height down slightly. You may just prefer a flat roof, in this instance you need to look out for the Pent Log Cabins.
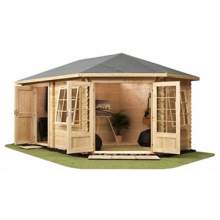
Do you have a particular corner of your garden that just needs filling? We have the perfect solution! A Corner Log Cabin can be tucked in to the corner of your garden using up minimum space giving you maximum room.
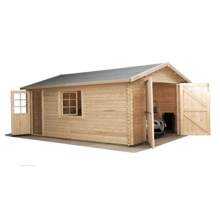
Have you just bought a property without a garage? Missing the space? How about a Garage Cabin. Not only can you store your car and/or motorbike. Some Garage Cabins include additional cupboards and storage space. What better extension to your home?!
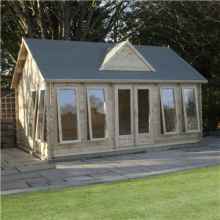
Looking for something attractive and eye catching for your garden? The Clock House Log Cabin will certainly live up to your expectations. If you are into your fitness, how about making it into your own gym, saving your hard earned cash from monthly contracts. Is there a musical teenager in your home? This would be perfect to make into a music studio – bringing peace and quiet back into your home at long last.
Seen a log cabin you like but not in the dimensions you were looking for? Please call us or email us so we can quote for any specification you would like.
We can manufacture to any specification. So if you require an extra window, side doors, internal room, skylights or unusual sizes - Please call us on 0844 736 5862 Mon-Fri 9am-5pm - press 1 for sales or send us an email to help@iliketosell.com
We are also able to quote for:
Roof & Floor Insulation Kits – Insulation kits would be recommended if you are thinking of using your log cabin as living space or simply spending a lot of time inside. Insulation kits keep your cabin warmer for longer.
Concrete Bases - We recommend any garden building be situated on to a solid, level, preferably a concreted or paved area. We understand this can sometimes be easier said than done and be become a big job in itself. Therefore, why not let us take the pressure off you and have our expert install team supply and prepare a concrete base for you.
Maybe you would prefer a Pressure Treated Wooden Base with Concrete Pins? Our install team are also able to offer this service. If you are unsure which base would suit you best, please call and speak with a member of our sales team for more advice.
Having Electrics fitted in your cabin may be something you are interested in? Especially if you require your cabin for appliances. Our electric pack includes 2 x Double Sockets and 1 Lighting Feed. If you decide to take advantage of our Installation service, our fitters will also install this service.
Installation is also available as an additional extra to save you the time in erecting your building. Our installation team are professional and reliable giving you the peace of mind that your building has been installed efficiently and correctly.
Most of our Log Cabins are supplied with free felt. As an alternative, Shingles are available as a different form of roof covering. Shingles are a form of roof tiles available in Red, Green or Grey/Black.
How lovely would it be to have bright green, perfectly cut grass all year round? We can help you achieve this dream buy offering you Artificial Grass as an additional extra to your order. Artificial grass is the perfect solution if you only have a small amount of grass or if it is hard to find time to cut your grass.
Our log cabins are constructed from thick top quality softwood. Our sheds are very well made with the best, long lasting materials.
The cabin is delivered untreated offering you the opportunity to protect and decorate it to your own personal taste. Untreated buildings do naturally grey with age within around 12 months. We would recommend that you treat your cabin during installation with a high quality preservative and at regular intervals according to the preservatives manufacturer's instructions. By doing this, we provide you with a 10 year anti rot warranty.
Sheds First products are manufactured here in the UK, which is how we can offer you a fast, affordable service.
Tilt & Turn Windows & Doors at No Extra Charge For 44m (and above) on our Discovery Premier Range
We supply as standard "Tilt & Turn' windows with a 5 point locking system for security and added rubber weatherproof sealing for a perfect shut every time.
Please note - 34mm will be supplied with Standard Double Glazed Windows NOT Tilt & Turn
Construction Main Points
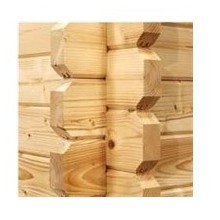
The log cabin is constructed from a choice of wall thicknesses; 34mm, 44mm, 70mm thick top quality softwood with double tongue and groove joints and wind tight chalet-connections to the corners.
The doors are made from laminated wood and are supplied with cylinder locks and handles.
Windows and doors are available in single or double glazing.
Included with your log cabin is pressure treated bearers which are situated beneath the floor providing maximum durability and all log cabins include a FREE floor.
Your cabin should be constructed on a solid, level base. Preferably a solid sheet concrete, concrete slabs or tantalized bearers. This is to prevent the floor of the cabin and the floor bearers from getting damp and rotting.
Dimensions – normally dimensions include nib to nib so deduct 10cm off each end for internal measurements.
Our Log cabins are not treated and you will need to treat your log cabin. You must apply treatments to your log cabin or components until you are satisfied with the product. Treating the wood will be deemed as acceptance of the quality of the goods and confirmation that you do not wish to return the product.
The Log Cabin packaging is a temporary packaging just for transportation to the customer. Although an outside product it is the customer’s responsibility to either treat the wood or keep it dry during the construction process. It is the customer’s responsibility to cover any exposed timber immediately after delivery to avoid blue stain issues.
We sell a range of treatments and colour treatments for your log cabin. Please call us on 020 3795 0222 or email us at help@iliketosell.com for further information.
Pressure treated bearers provide durability to the base. The Log Cabin must be constructed on a firm level base such as solid sheet concrete, concrete slabs or tantalized bearers. We are able to provide a concrete base or wooden pressure treated frame with concrete pins. Please call for further information.
We offer an installation service on all of our log-cabins. We also sell concrete bases, pressure treated wooden bases with concrete pins, roof and floor insulations kits, sky lights, shingles and electrics etc – just give us a call or email for a quote.
Typically the installation team will arrive the day after your Log Cabin has been delivered. It may be required for you to store your log cabin for 24/48 hours before installation. Our team have over 30 years of experience. The base must be prepared before the installation team arrives. It normally takes 1-2 days to install the log cabin. The team will arrive at 7am to make the most of their time - all coffee’s and biscuits most appreciated.
We have a degree in timber so that’s why we sell Summerhouses, Log Cabins, Arbours & Arches, Gazebos, Wheelie Bin Stores, Logs Stores and Storage Units for Mobility Scooters. In addition to this we stock a wide range of Lawn Mowers and Garden Machinery to go into your shed.
Summerhouses are a great solution if you are looking for an attractive new addition to your garden. Perfect for storage use or to decorate nicely and admire your garden from inside.
Our Playhouses are available in a massive variety, so we are sure you will find just what you are looking for. The playhouses are also all CE approved, meaning they are all tested and approved to the highest specification ensuring your children are safe from harm.
You can shop online 24/7 on our site. We provide a secure environment for you to browse and shop online with our encrypted secure checkout page providing you the security you expect. We do not store your credit card details and do not share your details with any 3rd parties.
If you have any questions please don’t hesitate to contact our team on 0844 736 5862 Mon-Fri 9am-5pm – press 1 for sales or email us at help@iliketosell.com
iLikeLogCabins.com is ranked 9.8 out of 10. Based on 213 user reviews.
iLikeLogCabins is one of the leading Log Cabins online retailers in the UK with Free UK Mainland delivery*. Please check each product page for lead times. Delivery is typically on a hiab. We will always liaise with you regarding delivery to make sure the delivery of your log cabin goes smoothly.
Health warning - it is the responsibility of the customer to check local planning laws and suitability for location. All the advice below is general advice only.
Rules governing outbuildings apply to sheds, greenhouses and garages as well as other ancillary garden buildings such as swimming pools, ponds, sauna cabins, kennels, enclosures (including tennis courts) and many other kinds of structures. Other rules relate to the installation of a satellite dish, the erection of a new dwelling or the erection or provision of fuel storage tanks.
Under new regulations that came into effect on 1 October 2008 outbuildings are considered to be permitted development, not needing planning permission, subject to the following limits and conditions:
• No outbuilding on land forward of a wall forming the principal elevation (i.e. Front of the house next to road)
• Outbuildings and garages with a single floor with maximum eaves (wall) height of 2.5m and maximum overall ridge height of 4m with a dual pitched roof or 3m for any other roof.
• Maximum Ridge Height 2.5m within a 2m of a boundary.
• We interpret this as follows. If you have an Apex Log Cabin – the pitch is a slant and if your cabin is greater than a width of 2m then the highest point (the ridge height of the Apex) will be beyond the 2m rule and therefore a max height of 4m or 3m will apply.
• No verandas, balconies or raised platforms. We believe this is not applicable to our veranda’s as the veranda is less than 300mm from the ground.
• No more than half the area of land around the "original house"* would be covered by additions or other buildings.
• In National Parks, the Broads, Areas of Outstanding Natural Beauty and World Heritage Sites the maximum area to be covered by buildings, enclosures, containers and pools more than 20m from house to be limited to 10m2.
• On designated land** buildings, enclosures, containers and pools at the side of properties will require planning permission.
• Within the curtilage of listed buildings any outbuilding will require planning permission.
*The term "original house" means the house as it was first built or as it stood on 1 July 1948 (if it was built before that date). Although you may not have built an extension to the house, a previous owner may have done so.
**Designated land includes national parks and the Broads, Areas of Outstanding Natural Beauty, conservation areas and World Heritage Sites.
If you want to put up small detached buildings such as a garden shed or summerhouse in your garden, building regulations will not normally apply if the floor area of the building is less than 15m2.
If the floor area of the building is between 15m2 and 30m2, you will not normally be required to apply for building regulations approval providing that the building is either at least 1m from any boundary or it is constructed of substantially non-combustible materials.
In both cases, building regulations do not apply ONLY if the building does not contain any sleeping accommodation.

")
")
")