You can also see the tab on our website to view our huge range of log cabins which prices include the installation service. This is definitely a not to miss offer on these selected cabins. To have the peace of mind of a professional to build your log cabin for you for no extra cost – what more could you ask for?! No need to doubt if you have the necessary tools, how much of your time it is going to consume and no worrying that you will build it incorrectly. Our range of cabins which have the installation service included are easy to find, you simply need to click the category link on the left hand side of the front page of our website which states ‘Log Cabins + Free Installation’, which will take you straight to them.
We do ask however, that you have prepared the base ready for our team of experienced installers to erect the building on to. We recommend you have a solid, level, preferably a concreted or paved area - always make sure you use a spirit level to be sure the area is level. If you don’t have a base, don’t worry, we have a solution for you below.
We also ask that the area has been cleared and there is easy access to your garden for the install team to get through. This is really important as the team will need sufficient room to move around the building and erect it. If you have no access to the back of your home from outside, we may ask that you take the parts of the building through your home to the back garden before the installers arrive as in most cases the team are not insured to be inside your home.
The whole service itself will usually take place over 1-3 days. We will usually deliver your cabin to you and then the following day the install team will come nice and early to make a start on the build. Dependant on the size of the building, the install can take 2-3 days to complete.
Our install team are friendly and professional with over 25 years’ experience, you can be assured peace of mind your cabin will be erected to the highest standard. It’s busy work, so tea and biscuits are always appreciated. If you are also concerned about preparing your base, we can also offer an additional service in which our team can also prepare your base for you for an extra charge. Why not, when you are having the installation service for free! All of the Discovery buildings come with a warranty.
Log cabin installation:
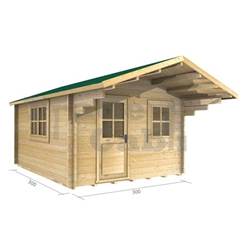
Ensure that you base is firm and level, for log cabin we would advise either a solid concrete base or concrete slabbing to the required dimensions of the building.
We recommend that a gap of 2ft is left between the edge of the base and any surrounding walls, fences or any other items, this will ensure there is sufficient clearance for building your log cabin and to allow you to treat the building afterwards with a good quality wood preservative.
Additional tools will be required to fit the building:
A rubber mallet
Hammer
Tape measure
Spirit level
Saw and a portable electrical drill are needed.
To start lay your floor bearer out and evenly space them across your base.
Whilst we would not advise installing in adverse weather if necessary some pvc striping can be used to cover the bearers and prevent any moisture from reaching the floor boards.
Once the bearers are down lay the initial base logs out across the bearers ensuring that all angles are square. These are then to be secured to the bearers using screws to prevent movement of the building.
Using a rubber mallet gently but firming tap the logs together at the joints making sure they are tightly secured within the tongue and groove across the entire length of the log .
Once you have built up the logs sufficiently around the entirety of the building to around a third of the way up the windows these can now be slotted into the areas provided, pressing down firmly on the top of the kit to make sure there are no gaps around the bottom edge.
Continue to build up the height of the wall logs to the height of the door frame work.
These framing pieces to be slotted to the bottom, side and top of the frame and tapped securely into place using the rubber mallet.
Once the wall logs have been successfully built up the next stage is to install the roof joists which are tapped in to the upright channels, these run from one side of the building to the other.
Your log cabin should be beginning to take shape you can now work on some of the smaller areas of the construction process.
The veranda area in front of the door is created using the pressure treated boards provided. If you use a spare board as a spacer between each slat this will create a consistent and even gap between the boards without need for constant measurement. The boards are then to be screwed to the bearers beneath ensuring that they are flush with the side of the log cabin.
The exterior support beam can now be installed onto the corner of the decking to support the overhang of the roof beams you may need to cut this down to fit as the beam is not pre-cut to allow for the roof beams. It can then be secured using appropriate screws.
When starting the roof place the initial board with the groove facing away from the building, line it up to the end of the roof joist and secure in place, then secure along the roof support beams before placing any other boards.
Lock all boards in place making sure the tongue of the board is securely within the groove of the next and flush at the edge before nailing each board to the roof beams at each end. When you reach the last board of the roof you may find that you have a larger overhang on the board than needed this should be cut down to be level with the end of the roof support beam, don’t worry this is perfectly fine and any rough looking edges will be covered by the roofing felt and facia boards.
When installing the floor secure the initial board against the cabin wall with the groove facing outwards and nail in place. On each board thereafter place the nails at an angle to make sure the slats are pushed together firmly with the groove of the next board covering the end of the nail. As with the exterior roof support you may need to measure and cut sections of the floor to allow for the internal angles of the wall logs. When you have finished with the floor you can now install the finishing strips which go around the edge of the flooring. Measure the internal dimensions of the cabin and then cut each length to size these are then secured around the edges of the floor to neaten any rough edges and give a more aesthetically pleasing floor.
Simply line up the barrels of the door hinges with that of the framework and slot the doors down, once the doors are closed they cover the framework preventing their removal for security.
The storm braces give extra support to the building during periods of high winds these are a fixed to the walls of the log cabin at the top and bottom of the bracer by drilling through the wall log and securing the bolt on the other side of the wall.
With the roofing felt roll this out in a large area and measure enough felt to cover the roof across the length of the apex, these need to be long continuous strips to ensure a secure covering, for this building you will need 5 strips. The felt should be laid leaving a 2 inch overhang along each edge of the building so that the felt can be secured to the roof beams and further protected with the fascia boards.
Secure the felt along the edges, placing tacks approximately 2 inches apart along the entirety of the roof. When laying the next strip of felt, overlap the lower piece by approximately an inch to ensure that water cannot collect on the roof and will run off evenly.
Fold the roofing felt over the edge of the roof and secure firmly to the ends of the roof support beams. Use the fascia boards to leaver the roof felt down this will now secure the felt and get your log cabin looking neat and tidy.
When attaching the fascia boards and finials, please make sure to pre drill any holes to prevent the wood from splitting.
For the final touches, ensure that the front felt of the log cabin is secured with even tacks for a professional finish
If you are thinking of buying a new log cabin, size is likely to be a major consideration, closely followed by choosing the right design for your garden and wall thickness. Unlike when you buy a home, you can’t add extra rooms to a log cabin, or extend up into the loft, so it’s important that you make the right decision first time around. So why is size so important and is there any benefit to scaling up your order?
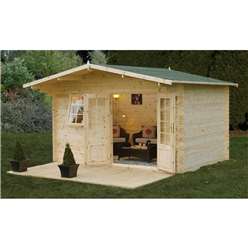
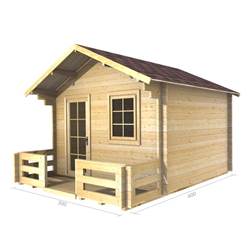
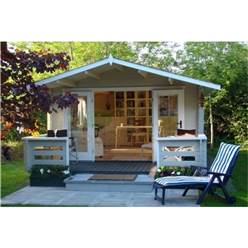
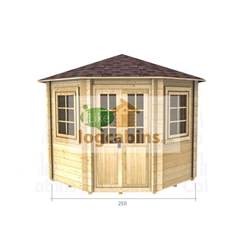
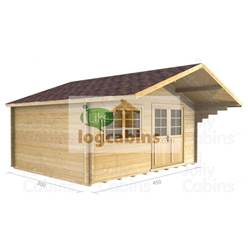
Small log cabins in the region of 2m x 2m can be used for many purposes. A straightforward log cabin with an apex roof, door and window makes an excellent shed for storing garden equipment, tools, bicycles, and anything else you don’t have room for in the garage. You can also use a small log cabin as a kids’ playhouse – rather than cluttering up your home with their toys, throw them all in the playhouse and enjoy having a tidy living room for once. Smaller log cabins are also perfect for smaller gardens where there isn’t room for a larger structure. Small, corner log cabins are a good example of a design that would work well in a smaller garden.
The disadvantage of a small log cabin is the lack of space. Whilst a smaller log cabin is good for occasional use, it might not work so well if you are looking to create some extra living space outdoors. That said, if you need a space for your hobbies, a small log cabin might be perfect.
As long as you choose a log cabin with an appropriate wall thickness so you can use it all year round, there should be more than enough room in a smaller lob cabin. For example, you could turn your log cabin into a sewing room, somewhere quiet to write a novel or build replica WW2 planes. Basically, what you do in there is up to you, but don’t assume you need tons of space if there is only going to be you in there most of the time.
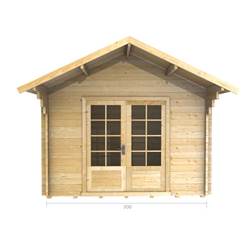
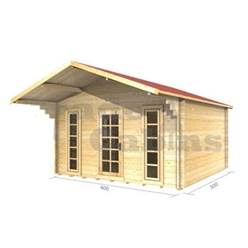
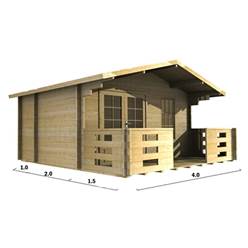
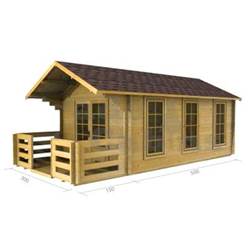
Medium log cabins are the next size up. These are ideal when a bit of extra space is required, but you don’t necessarily want to use up too much of your garden. Children’s playhouses often benefit from being a bit larger, especially if you have more than one child. You might also prefer to opt for a medium sized log cabin if you want a summer house for outdoor entertaining – smaller log cabins will feel cramped if you have several guests over.
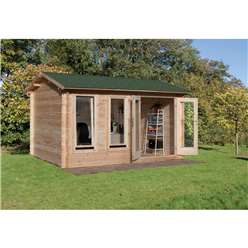
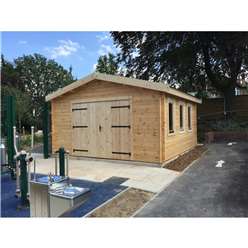
Larger log cabins make excellent home offices and workshops, although you will need to ensure you buy a product with thick enough walls, or it might get rather chilly in the winter time. Do bear in mind however that a large log cabin will take up more space in your garden, which is fine if you have acres to play with, but could be problematic if your garden is a little on the ‘compact’ side.
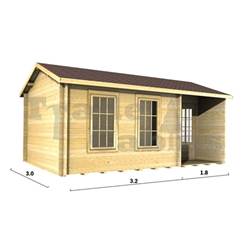
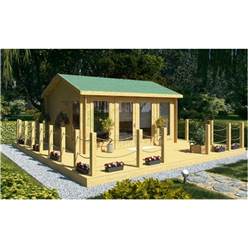
Some of the larger log cabin designs incorporate a decking area and roof overhang. For these, although the footprint is necessarily on the larger side, the actual living/working space is not so large. This could be a good compromise for you, especially if your log cabin is intended to provide a bit of extra living space during the summer.
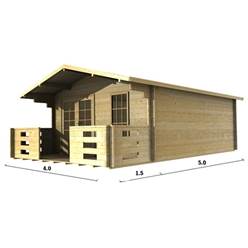
For those who intend on spending a significant amount of time in their log cabin, an extra large unit is really the best way forward. The more space there is, the more flexibility you have. Extra large log cabins around 7m x 5m can be transformed into permanent living accommodation, guest bedrooms, and even holiday homes. There is typically enough space in a larger log cabin for a bedroom, living room, kitchen and bathroom. Alternatively, an extra large cabin is a good fit if you are looking for a roomy home office or workshop.
Unless money is no object, size is always going to clash with budget. Or in other words, as much as you would like to buy a larger log cabin, your budget just won’t accommodate the extra expenditure. If this is the case, it may be worth waiting for the next sale to see if you can get more for your money on a reduced log cabin.
Don’t underestimate the importance of wall thickness when looking at log cabins. The more time you intend on spending in your log cabin, the thicker the walls need to be, which may mean you have to go for a smaller model if you are shopping on a tight budget.
If you have any questions about any of our log cabins, talk to a member of our friendly customer service team today.
One of the things that might put you off buying a log cabin is the notion that someone (potentially you) is going to have a devil’s own job installing the thing. Clearly if you are an experienced DIY enthusiast, building a log cabin from scratch and installing it in your garden won’t cause you too much concern, but if you barely know one end of a hammer from the other, installation will be a big headache.
Thankfully, certain ranges of log cabins come with free installation included as part of the package. So instead of losing sleep over who is going to unpack the bits and put them together, you don’t have to worry about a thing other than choosing the log cabin that best suits your individual requirements.
The Discovery Premier range of log cabins comes in many different sizes and designs. At the lower end of the range we have small cabins with glazed doors, which are perfect as occasional summer houses or kids’ playhouses. Larger, more deluxe log cabins can be used for outdoor entertaining purposes, as hobby rooms, extra living space, and even as home offices. And if you really want to push the boat out, go for a super deluxe, bespoke twin skin log cabin, with an insulated roof and enough space to create eight separate rooms inside and a decking area outside.
Choosing a professional installation package will give you peace of mind when you spend your hard earned savings on a brand new log cabin. Some of the larger Discovery Premier range of log cabins require specialist skills and plenty of experience to ensure the installation runs smoothly. Unless you have done this type of installation before, you might not have the necessary tools. You probably won’t have the time either, so for your peace of mind, we always recommend opting for the free installation package that comes with this range of log cabins.
Our log cabin install team have many years’ experience, so your log cabin will be constructed to the highest standard possible. With any building, the right installation is important, for any niggling problems at the outset will only snowball into major problems further down the line.
The only thing you need to worry about when you take advantage of our free log cabin installation services is preparing the base for the structure and making sure there is access to the chosen site.
Before you start preparing a base for your new log cabin, make sure you are 100% happy with the chosen location, since it will be difficult to move the log cabin once it is in place. Where you site the log cabin will probably depend on what you intend to use it for. A kids’ playhouse should be fairly close to the house so you can keep an eye on your children as they play, but a home office or hobby room might be better tucked away in a peaceful corner of the garden where you will enjoy more peace and quiet. So give this plenty of thought before you start preparing the ground ready for the installation team.
Log cabins need a firm, flat base, or the integrity of the structure will be compromised. A cheap and easy solution is to lay some paving slabs on a bed of sand and cement, but they do need to be flat. You can also lay building blocks to support the wooden bearers that will be placed beneath the cabin floor. Another alternative is to build a concrete base, and if you are buying a larger log cabin, this is the best solution.
Preparing the base for a log cabin isn’t too difficult, but if you don’t have the skills, time or inclination to start mixing concrete or moving heavy paving slabs around, you can either organise for someone to come and prepare a base for you, or arrange for the installation team to do the job as an additional job while they carry out the main build.
The free installation service is an excellent reason to buy a log cabin from the Premier Discover range. The money you save on installation can be spent on landscaping and decorating your new log cabin, which will be a lot more fun than wrestling with large timber panels and trying to figure out what goes where!
For more information about our free installation service, contact our customer service team today.

")
")
")